Dive into the backend
Now that the application is up and running, let’s open the hood and play around with some of the backend componentry.
Go back to the CloudFormation console, open the stack details page for your application, go to the Outputs table, and find the WebApplication URL. This is the public endpoint to your deployed application. Click the link to open and explore your brand-new Bookstore!
Since this is a completely new instance of the application, your username and password that you used before in Step 1 won’t work. Sign up for an account in your Bookstore, and test out the app! Test to make sure the email verification works, and run through some of use cases like search, cart, ordering, and best sellers.
Change the author of a book in DynamoDB
Since you’ve deployed this application, you deserve a reward! Let’s make you the instant author of your favorite book in the bookstore.
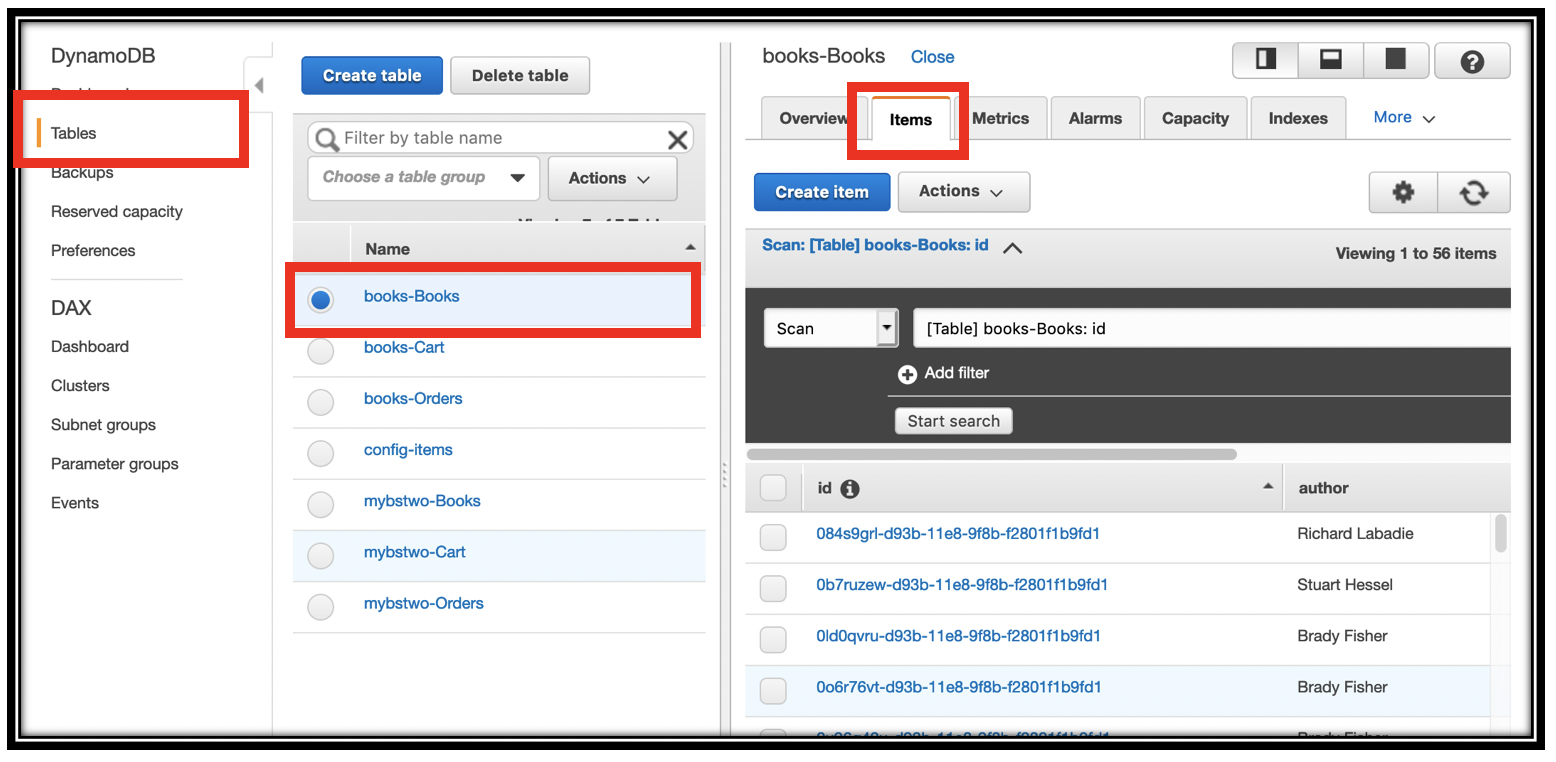
- Open the DynamoDB console
- On the left, select Tables. In the middle, select your <project-name>-Books table. At the top, select Items
- Scroll through the table, looking at the Name column, and pick your favorite.
Hover over the author column, and click the pencil icon to change the Author name to your name. Make sure to click Save to save your changes.
Refresh the bookstore page. Type the title of the book, or your name, in the search bar. Congratulations, you are an author in your own personal bookstore. That was fast - no messing around with publishers, or authoring books! You became an author in seconds.
This example illustrates DynamoDB Streams to Amazon Elasticsearch Service interation. When you make a change in DynamoDB, it emits a record to its stream. You can refer back to the CloudFormation template, and find the table definition by searching for TBooks. Note the StreamSpecification property, which tells DynamoDB to send NEW_AND_OLD_IMAGES to the stream when items change.
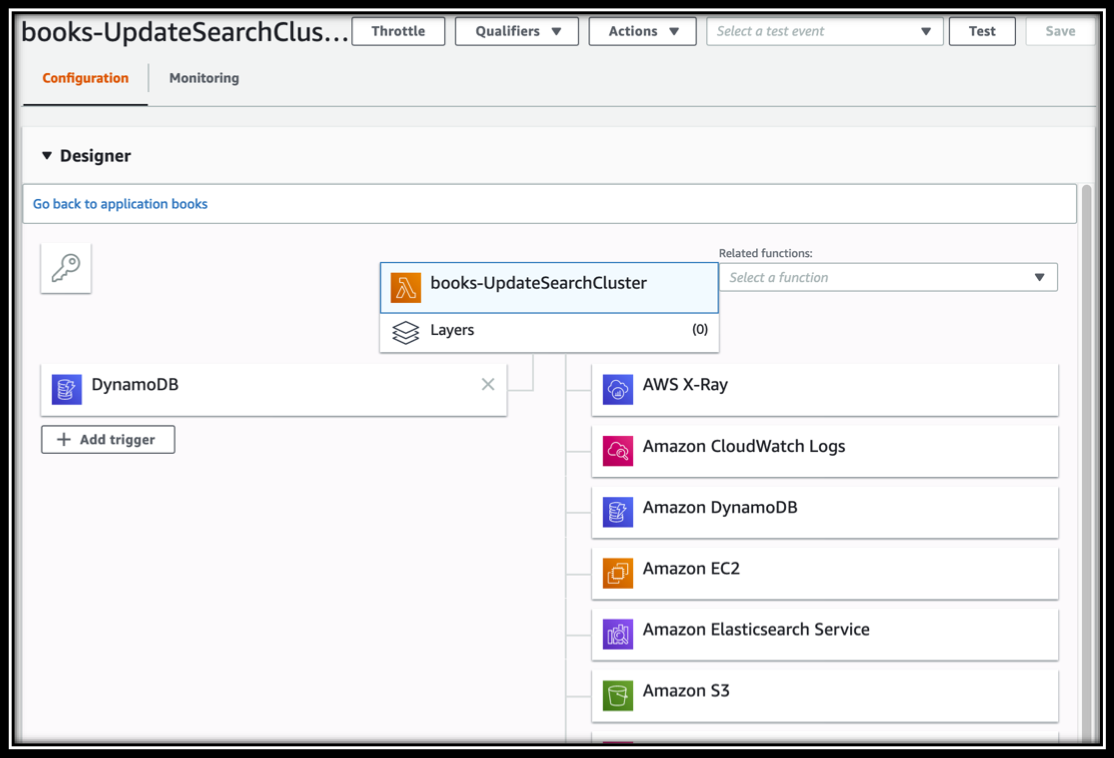
The Bookstore Demo App uses a triggered Lambda to catch items in the stream and update the Amazon Elasticsearch Service domain. You can find the definition of the update function in the CloudFormation template. It’s named UpdateSearchCluster. Navigate to the Lambda console and type <project name>-UpdateSearchCluster in the filter. Find and click the Function name to see the Function configuration
Changes to your source of truth, DynamoDB in this case, propagate out to many of the services using this methodology - DynamoDB Streams triggering a Lambda function to propagate your data across your application.
At the top of the Function configuration section, you can see the triggers for the function on the left (DynamoDB) and the permissions this function has for accessing other services (AWS X-Ray, Amazon CloudWatch Logs, etc.) The permissions are set by the Execution role for the function. Towards the bottom of the page, below the code editor, find the Execution role section. At the bottom, you can click View the <project name>-ESSearchRole to view the role in the IAM console. You can also find its definition in the CloudFormation template, by searching for ESSearchRole.
Briefly examine the code in the Function code section. The function loops through the event records, and either removes the document from Elasticsearch or updates it depending on the value of eventName.
A final thing to note is that the template sets Environment variables based on the resources it has created. This is how the Lambda function receives the ESEndpoint, for example, without your having to configure it manually. This is a very common pattern - passing resource names, ARNs, endpoints, etc. through environment variables to templated Lambda functions. You can see how these values are wired up by examining the declaration of the UpdateSearchCluster function.
Manually edit the leaderboard/Best Sellers list
First, make sure you have at least two books in your Past orders list with different order quantities.
- Scroll down a bit to the Cookbooks section.
- Click the Add to cart button for each of these to get 4 books in your cart.
- On the Cart page, set the quantity of one of the books to be 1000. You can set the others to different numbers, or leave them at 1.
- Click Checkout and then Click Pay.
Don’t worry, we won’t charge you! You can leave the credit card information as-is, it’s not validated. Please don’t use your actual credit card information.
You can examine your order by returning to the home screen (click the
![]() icon at the top of the page). At the top right of the home page, click Past orders
icon at the top of the page). At the top right of the home page, click Past orders
You can similarly examine the Best sellers.
Unless you’ve already created multiple accounts for the book store, the books in your Past orders list will match the books in the Best Sellers list (since the bookstore started with no orders).
You ordered 1000 copies of one of the books to bump it to the top of the list. That was clearly an ordering error, so let’s go correct the Best Sellers list.
- Open the DynamoDB console and find the <project name>-Orders table.
- Find the entry for your big order and click the item to edit it.
- Open the “books” list, and then edit the “quantity” to be less than one of your other ordered books. I ordered 3 item of each of 3 books, and 1000 of Scream Ice Cream. I set the order quantity to 2 for Scream Ice Cream.
- Click save.
- Wait a few moments, and then go to the bookstore endpoint and refresh the Best sellers page. You should notice the book moved in the list.
Just like with updating the search experience, in the backend, DynamoDB Streams automatically pushed this information to ElastiCache for Redis, and the Best Sellers list was updated.